Delightful Grinch Cupcakes: A Whimsical Holiday Treat for All Ages
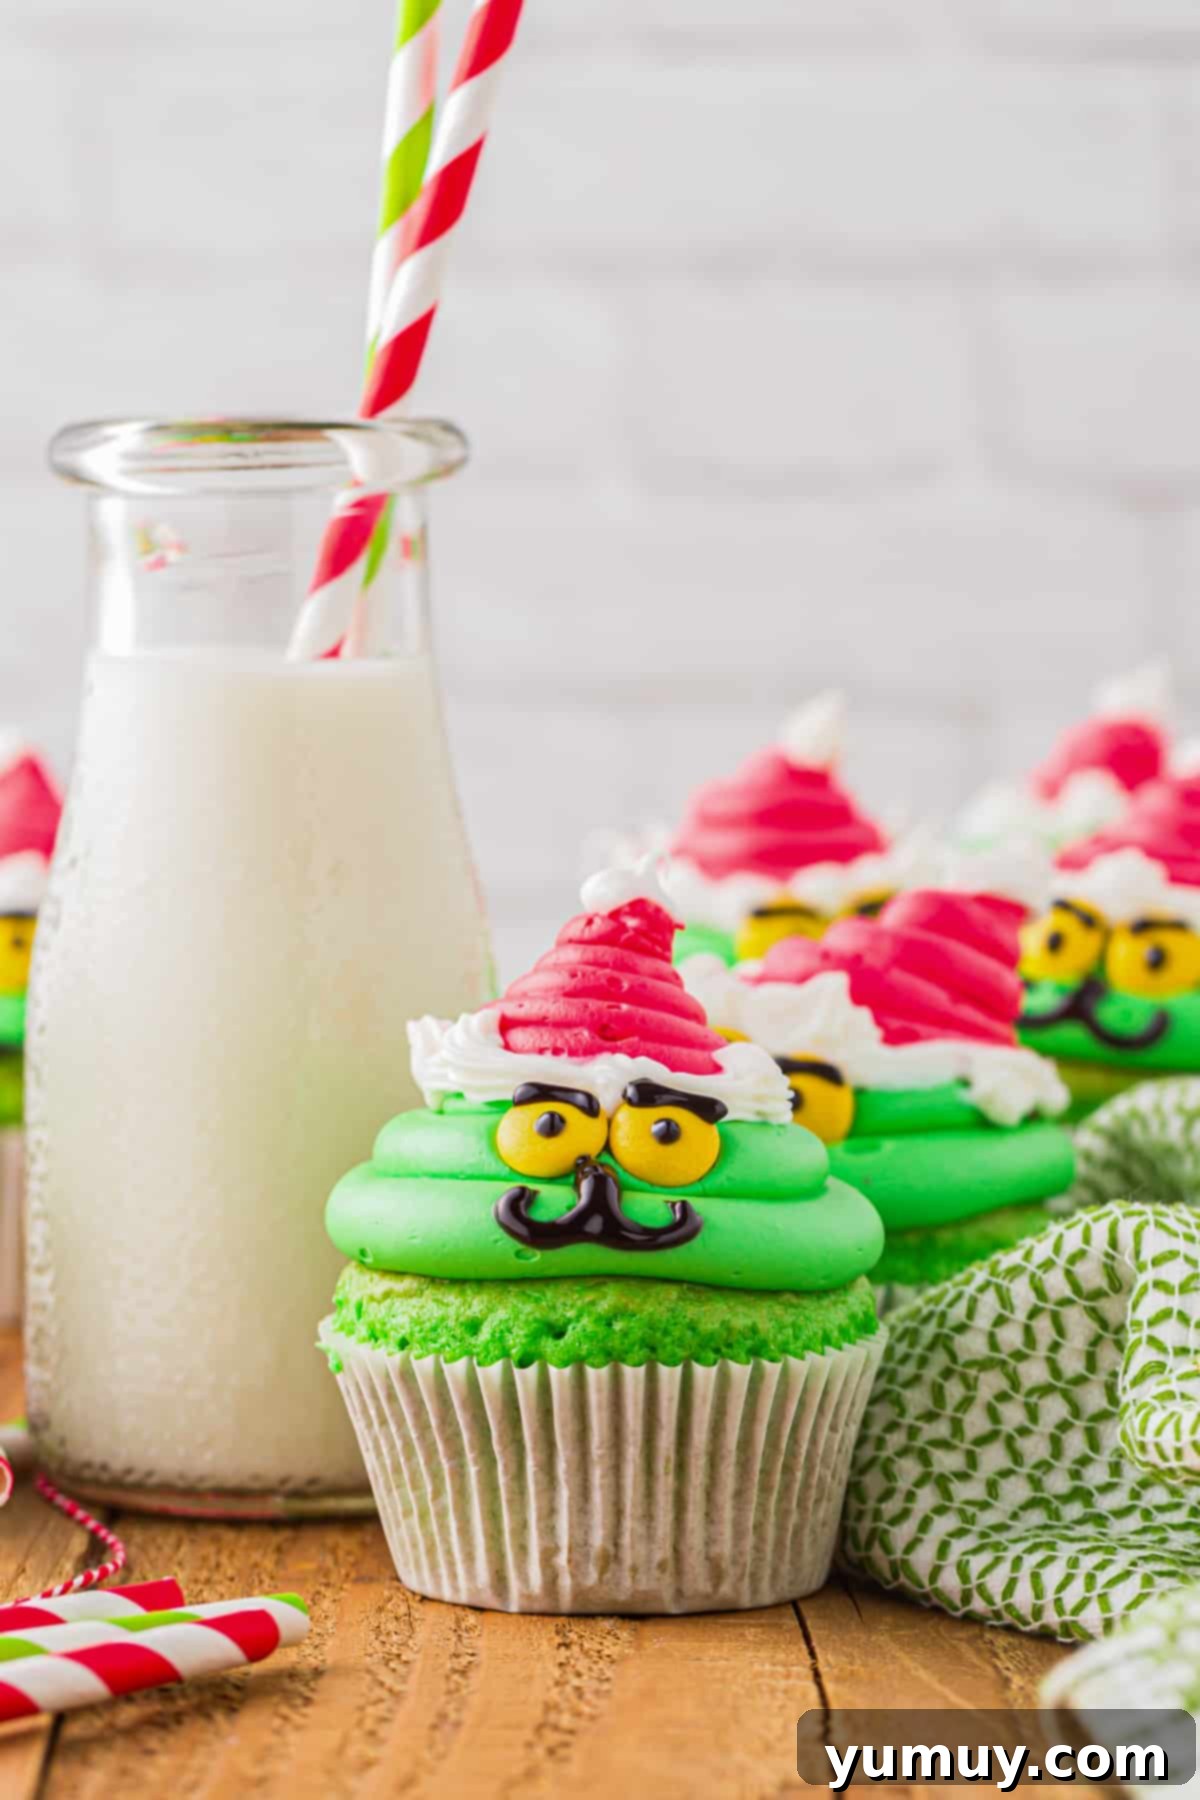
Unleash your inner Whoville spirit this holiday season with these irresistibly charming Grinch Cupcakes! Whether you’re hosting a festive party, looking for a fun family baking project, or simply want to spread some Grinchy cheer, this recipe is your golden ticket. Crafted with readily available boxed cake mix and canned frosting, these cupcakes are designed for ease, ensuring a stress-free baking experience even for novice bakers. The magic truly begins when you start decorating, transforming simple green cupcakes into iconic Grinch faces, complete with their signature smirk and Santa hats. It’s a creative activity that promises laughter and joy, making it perfect for involving the kids. Each bite is a sweet reminder of the beloved Dr. Seuss classic, making these treats not just delicious but also a centerpiece for creating cherished holiday memories.

- Pin this recipe for later!
Crafting the Perfect Grinch Cupcakes: A Detailed Overview
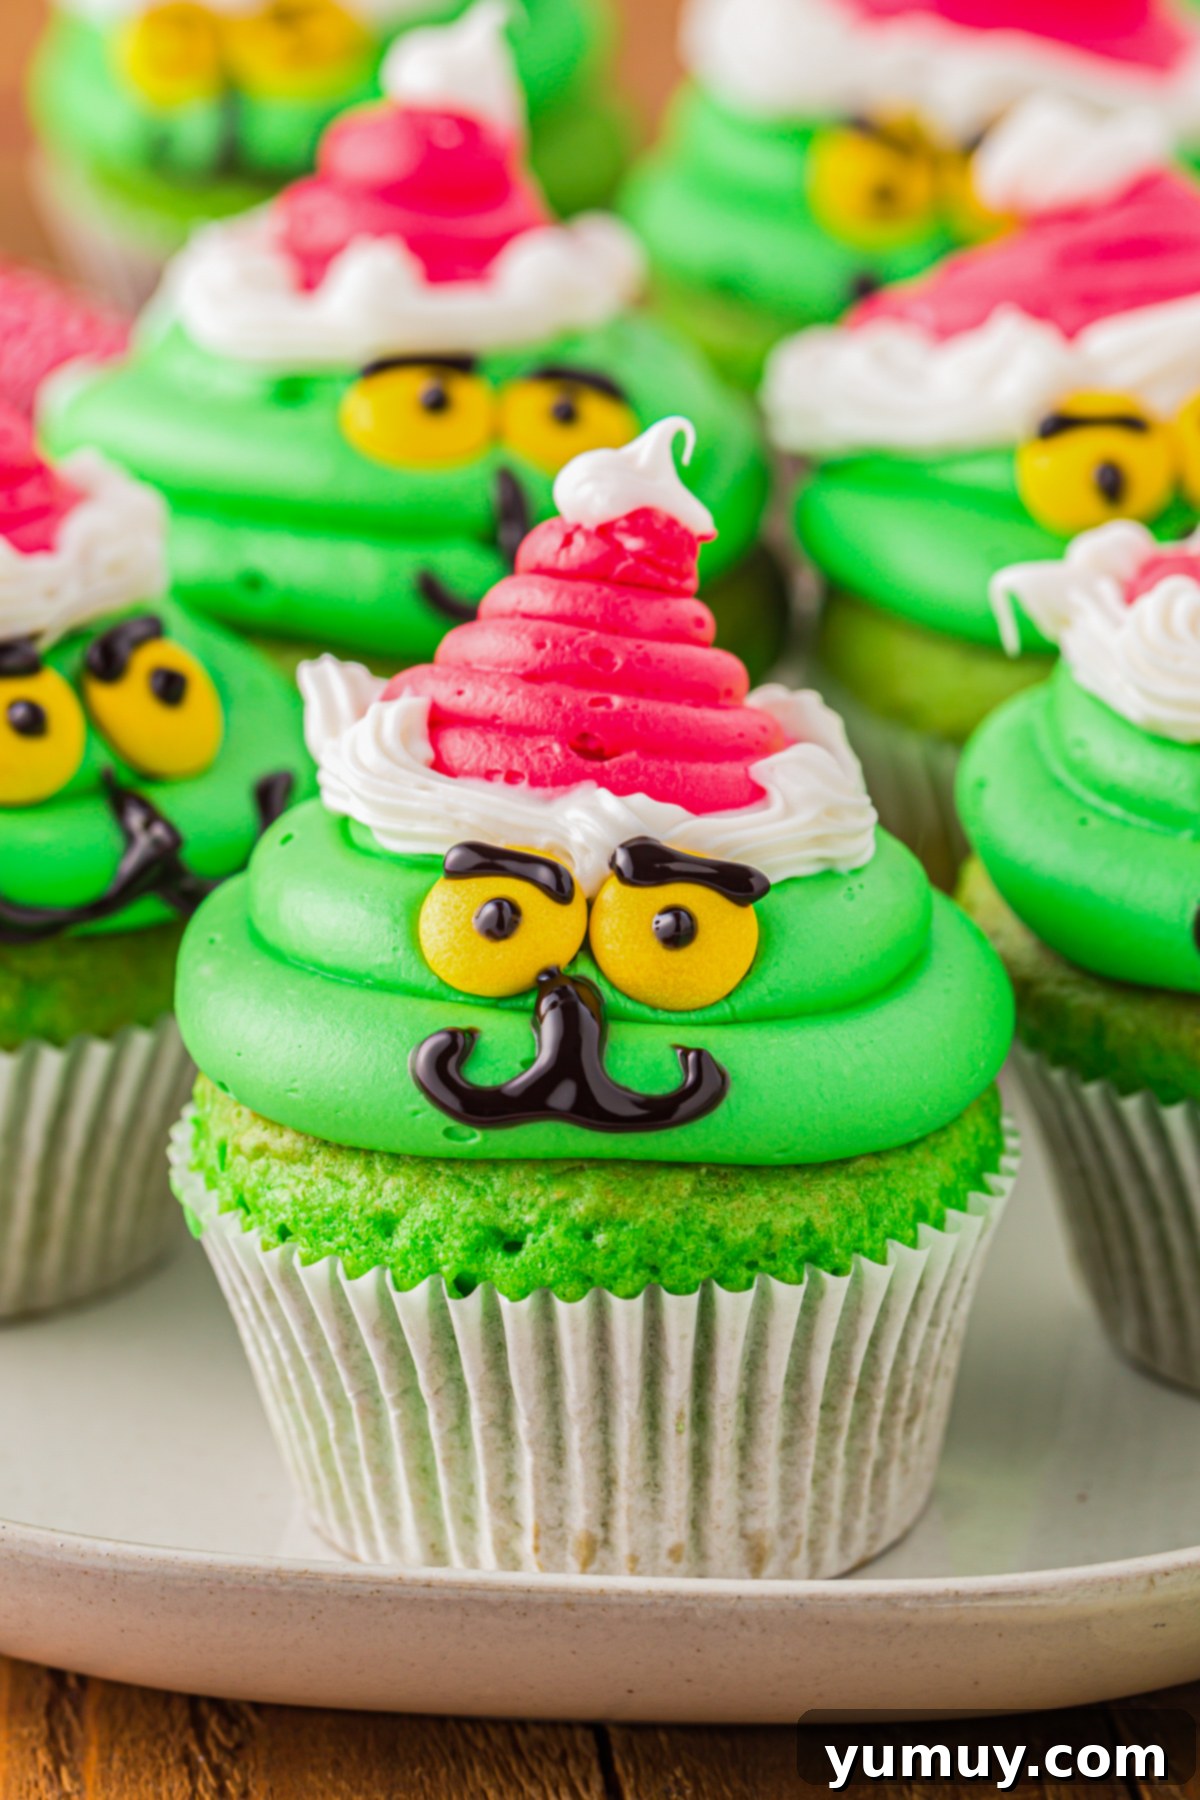
Bringing the Grinch to life in cupcake form is a delightful journey of color and character. The iconic smug face of the Grinch is easily achieved using a combination of black decorating icing for the expressive eyebrows and yellow Reese’s Pieces candies for his piercing eyes. If Reese’s Pieces aren’t available, yellow M&M’s make an excellent substitute, offering the same vibrant pop of color. The vibrant, almost neon green hue of both the cake and the frosting is paramount to capturing the Grinch’s essence. This signature color is best achieved with neon green food coloring, which delivers an intense shade that truly stands out. For those who prefer a more natural approach, a high-quality matcha green tea powder can impart a beautiful, subtle green with an interesting flavor profile. To ensure the green truly shines and achieves maximum impact, it’s highly recommended to start with a white cake mix and white icing. This light base allows the food coloring to develop into its truest, most vivid shade, making your Grinch cupcakes as visually striking as they are delicious. Every element, from the cake’s fluffy texture to the rich, creamy frosting, contributes to a dessert that’s not only festive but also incredibly tasty.
Why You’ll Adore These Grinch Cupcakes
- **Uncomplicated Baking:** With a foundation of boxed cake mix and pre-made frosting, this recipe eliminates complicated steps, making it accessible for bakers of all skill levels.
- **Family-Friendly Fun:** Decorating these Grinch cupcakes is an engaging activity that brings families together, sparking creativity and creating joyful holiday memories. Kids will love personalizing their Grinch faces!
- **Visually Stunning:** The vibrant green, contrasting red Santa hats, and mischievous Grinch faces make these cupcakes an undeniable showstopper at any holiday gathering or bake sale.
- **Customizable & Versatile:** From different candy eyes to homemade frosting, the recipe offers flexibility for personal touches and dietary considerations.
- **Perfect for the Holidays:** These cupcakes perfectly encapsulate the whimsical spirit of the Christmas season, adding a playful touch to your dessert spread.

Maximizing Freshness: How to Store Your Grinch Cupcakes
Proper storage is key to ensuring your festive Grinch Cupcakes remain as delicious and delightful as when they were first made. To maintain their quality and extend their shelf life, always store them in an airtight container. This prevents them from drying out and keeps the frosting fresh and moist. At room temperature, in a cool, dry place, these cupcakes will stay fresh and enjoyable for up to 2 days, making them perfect for immediate celebrations. For slightly longer enjoyment, you can refrigerate them for up to 1 week. When storing in the refrigerator, it’s often best to place them in a single layer to prevent the frosting from getting squashed. If you’re planning ahead for a future event or simply want to keep a batch ready for unexpected guests, Grinch Cupcakes freeze exceptionally well. They can be stored in the freezer for up to 1 month. To freeze, arrange them in a single layer in an airtight container or individually wrap them in plastic wrap before placing them in a freezer-safe bag. When you’re ready to indulge, simply let them thaw at room temperature for a few hours before serving. This ensures the cake regains its soft texture and the frosting becomes perfectly creamy again. With these simple storage guidelines, you can enjoy your whimsical Grinch Cupcakes long after the holiday season has passed.
Essential Tips for Grinch Cupcake Perfection
Achieving bakery-quality Grinch Cupcakes at home is entirely within reach with a few helpful tips and tricks. These pointers will guide you through the baking and decorating process, ensuring your cupcakes turn out not only delicious but also visually spectacular.
- Even Baking is Key: To ensure all your cupcakes bake uniformly and achieve that perfect domed top, make it a habit to rotate your cupcake tins halfway through the baking time. This helps counteract any hot spots in your oven, leading to consistently baked treats.
- Patience with Cooling: Resist the temptation to decorate warm cupcakes! It’s absolutely crucial to allow the cupcakes to cool completely before you even think about applying frosting. Warm cupcakes will cause your frosting to melt, slide off, and create a messy, un-Grinch-like disaster.
- Mastering Food Coloring: Remember that food coloring tends to intensify and darken as it sits and mixes with the ingredients. When adding your neon green or red, start with a smaller amount than you think you need, mix it in thoroughly, and then let it sit for a few minutes. Observe the color development before deciding if you need to add more. It’s always easier to add color than to remove it!
- Frosting Temperature Matters: The consistency of your frosting is vital for smooth piping. If your canned frosting has been sitting out and feels too soft or runny, it won’t hold its shape when piped. To fix this, simply refrigerate the frosting for 10 to 15 minutes. This will firm it up just enough to make it workable, preventing it from sliding off your beautifully baked cupcakes.
- Streamline Your Decorating: To maintain efficiency and ensure you have enough of each color, prepare and pipe one color of frosting at a time. For instance, mix all your green frosting and pipe the Grinch heads on all cupcakes before moving on to color and pipe the red Santa hats. This method also helps prevent colors from accidentally mixing or running out prematurely.
- DIY Neon Green: Don’t have neon green food coloring on hand? No problem! You can easily create a vibrant Grinchy green by combining standard food colorings. Start with about 15-20 drops of yellow food coloring and add 2-3 drops of blue food coloring. Mix thoroughly and adjust as necessary, adding more yellow or blue a drop at a time until you achieve your desired shade of green.
- Piping Without Tips: If you lack a professional piping tip set, you can still achieve impressive results using simple Ziplock bags. Fill a sturdy Ziplock bag with your frosting, snip a small corner off the bag with scissors, and voilà – you have an instant piping bag! You can cut different-sized holes to create various thicknesses for outlines, fillings, and details.
- The Grinch’s Signature Scowl: To give your Grinch cupcakes that unmistakably mischievous and “meaner” look, pay special attention to his eyebrows. Pipe the black eyebrows so they slant distinctly inward towards the center of his face. This small detail makes a huge difference in capturing his iconic character and adding to the whimsical charm of your festive treats.


Grinch Cupcakes Recipe
20 minutes
20 minutes
40 minutes
24 cupcakes
- Save to Pinterest
- Share on Facebook
- Send over email
Print Recipe
Ingredients
- 15.25 ounces white cake mix (1 box)
- 3 large eggs room temperature
- 1 cup milk room temperature
- ½ cup salted butter melted (1 stick)
- Neon green food coloring
- 32 ounces white frosting (2 tubs)
- ¼-½ cup powdered sugar
- 48 yellow Reese’s Pieces (or M&M’s)
- Red food coloring
- 0.67 ounces black decorating icing (1 tube)
Units: US Customary
Equipment
- Kitchen Scale (optional)
- 2 Cupcake Tins (12-count each)
- Hand Mixer
- Piping Tip Set (Recommended: Wilton 2A, #22, #12)
- Piping Bags or Ziplock Bags
Instructions
- Preheat your oven to 350°F (175°C) to ensure it reaches the correct baking temperature. Prepare two standard 12-count cupcake tins by lining each cavity with festive white or green paper cupcake liners. This step ensures your cupcakes bake neatly and are easy to remove.
- In a generously sized mixing bowl, combine the contents of one 15.25-ounce box of white cake mix with 3 large eggs (at room temperature for better emulsion), 1 cup of milk (also at room temperature), and ½ cup of melted salted butter (equivalent to one stick). Using a hand whisk, beat these ingredients together until they are thoroughly combined and smooth. This process typically takes about 2-3 minutes, resulting in a consistent batter.

- Now, it’s time to infuse your batter with the Grinch’s signature hue! Gradually mix in neon green food coloring. Add a few drops at a time, mix well, and observe the color. Continue adding small amounts until you achieve a vivid, unmistakable Grinchy green that is both bright and consistent throughout the batter. Remember, the color can deepen slightly upon baking.

- Carefully scoop the green cupcake batter into the prepared muffin tins. Fill each paper liner approximately two-thirds of the way full. This allows room for the cupcakes to rise without overflowing, ensuring a neat and uniform appearance.

- Bake the cupcakes in your preheated oven for 19-23 minutes. Baking times can vary, so keep an eye on them. You’ll know they’re perfectly baked when the tops gently spring back when lightly tapped, and a toothpick inserted into the center of a cupcake comes out clean, free of wet batter. Once baked, remove them from the oven and transfer them to a wire rack. It is absolutely essential to allow the cupcakes to cool completely to room temperature before attempting any decoration; otherwise, your beautiful frosting will simply melt.

- Now for the Grinch’s head! Take one 16-ounce tub of white frosting and stir in neon green food coloring until the color matches your vibrant green cupcakes. This ensures a seamless look between the cake and the Grinch’s face.
- Transfer this green frosting to a large mixing bowl. Add ¼ to ½ cup of powdered sugar to the frosting. Using a hand mixer, beat the frosting and powdered sugar together until the frosting is well combined and reaches a thick, pipeable consistency. The frosting should hold its shape firmly. If it appears too soft or begins to sag, add a little more powdered sugar, one tablespoon at a time, and beat again until the desired stiffness is achieved.

- Scoop the thickened green frosting into a piping bag fitted with a Wilton 2A piping tip (or a large round tip). Pipe a generous swirl of green frosting onto the top of each cooled cupcake. This swirl will form the Grinch’s head. Aim for a size that adequately covers the cupcake and provides enough surface area for the eyes and the Santa hat without being overly large or towering.

- Carefully place two yellow Reese’s Pieces candies side-by-side on the lower front portion of each green-frosted cupcake. These will serve as the Grinch’s characteristic yellow eyes. Make sure they are relatively close to each other to give him his signature narrow-eyed look.
- From your remaining tub of white frosting, scoop approximately ¾ cup into a separate piping bag fitted with a #22 Wilton piping tip (or a medium star tip). Set this bag aside for now; this white frosting will be used for the trim and pom-pom of Santa’s hat.
- To the rest of the white frosting in the tub, add red food coloring. Mix diligently until you achieve a deep, rich Christmas red color. This will form the main part of the Grinch’s Santa hat.

- Transfer the vibrant red frosting into a piping bag fitted with a #12 Wilton piping tip (or a medium round tip). Pipe a Santa hat shape onto the top of each Grinch head. Position the hat slightly back from the eyes, creating a peak. The hat should not cover the entire green surface, leaving enough room around the base and at the tip for the white frosting details.
- Retrieve the piping bag with the white frosting (fitted with the #22 star tip). Use it to pipe a fluffy white trim around the base of each red Santa hat. Then, pipe a small, round dollop of white frosting at the very tip of the red hat to create the classic pom-pom. These white details truly make the hats pop!

- Finally, for the Grinch’s expressive face, use the 0.67-ounce tube of black decorating icing. Carefully pipe small, round irises onto the yellow Reese’s Pieces eyes. Then, pipe the Grinch’s signature slanted eyebrows just above his eyes, ensuring they angle inward towards the center to achieve his characteristic mean and mischievous expression. If the eyebrows seem too close to the green, you can pipe them directly onto the white outline of the hat for clarity.
- Your adorable and delicious Grinch Cupcakes are now complete! Gather your family and friends, serve them up, and enjoy the festive delight. These cupcakes are sure to be a hit and bring smiles to everyone’s faces.

Notes
Storage: To maintain peak freshness, store your decorated Grinch cupcakes in an airtight container. They will remain fresh at room temperature for up to 2 days, in the refrigerator for up to 1 week, or in the freezer for up to 1 month. Always allow frozen cupcakes to thaw at room temperature before serving to restore their optimal texture.
Calories from Fat 108
Becky Hardin
- Share on Facebook
- Share on X
- Share on Instagram
- Save to Pinterest
Did You Make This?
We love seeing what you’ve made! Tag us on social media at @easydessertrecipes for a chance to be featured.
More Festive & Fun Cupcake Recipes to Explore!
If these Grinch Cupcakes have sparked your festive baking imagination, you’ll be thrilled to discover more delightful cupcake creations from our collection. Whether you’re in the mood for classic flavors or something wonderfully whimsical, we have a cupcake for every occasion and every baker. Explore these enchanting recipes to add even more sweetness to your celebrations!
Irresistible Chocolate Chip Cupcakes
A timeless classic reinvented in cupcake form, these chocolate chip delights are perfect for any gathering, featuring fluffy cakes studded with rich chocolate and topped with a creamy frosting.
Luxurious Black Forest Cupcakes
Indulge in the decadent combination of rich chocolate, tart cherries, and luscious whipped cream with these miniature versions of the beloved Black Forest cake.
Refreshing Orange Creamsicle Cupcakes
Capture the nostalgic flavors of summer with these zesty orange cupcakes, complete with a creamy, dreamy filling that evokes the classic creamsicle treat.
Zesty Lemon Cupcakes with Lemon Whipped Cream Frosting
Brighten any day with these tangy and sweet lemon cupcakes, crowned with a light and airy lemon whipped cream frosting for a truly refreshing dessert.
Browse All Cupcake Recipes


