As the festive season approaches, the kitchen transforms into a magical workshop, bustling with the sweet aromas of holiday baking. Among the cherished traditions, crafting unique and delightful Christmas cookies holds a special place. This year, add an extra touch of whimsy and joy to your holiday cookie platter with these enchanting **Reindeer Linzer Cookies**. These aren’t just any festive treats; they are charming, cookie butter-stuffed delights, artfully decorated to resemble Rudolph, the most famous red-nosed reindeer!

I’ve taken the beloved classic Linzer cookie and infused it with even more Christmas spirit. By swapping the traditional jam for a luscious cookie butter filling and adorning them with adorable reindeer faces, these cookies become a show-stopping centerpiece for any holiday gathering. Imagine the delight on your family’s faces when they discover these charming Rudolph cookies, as delicious to savor as they are fun to create! The cookie dough itself is straightforward, and to make your holiday baking even easier, we’re utilizing convenient store-bought cookie butter for a rich, creamy center. The final decorative touches are simplified with melted chocolate and vibrant cinnamon candies, making these Pin this recipe for later! cookies a joy to bake and a dream to eat.
Why You’ll Love These Festive Reindeer Cookies
These **Reindeer Linzer Cookies** are more than just a dessert; they’re an experience! Here’s why they’ll become your new favorite holiday tradition:
- Irresistibly Adorable: Their cute Rudolph faces instantly bring smiles and festive cheer, making them perfect for children and adults alike.
- Unique Flavor Profile: The rich, spiced cookie butter filling offers a delightful twist on traditional Linzer cookies, creating a flavor that’s both comforting and exciting.
- Fun to Make: The decorating process is simple and enjoyable, making it a wonderful activity to share with family during the holidays.
- Perfect for Gifting: Beautifully packaged, these cookies make thoughtful homemade gifts for neighbors, teachers, and friends.
- Classic Cookie, Modern Twist: Linzer cookies have a timeless elegance, and this reindeer adaptation adds a playful, contemporary touch without sacrificing quality or taste.
- Crowd-Pleaser: Whether at a holiday party or a cozy family evening, these cookies are guaranteed to be a hit.
Ingredients for Our Charming Reindeer Linzer Cookies
Crafting these delightful **Reindeer Cookies** requires a few simple yet essential ingredients. Each one plays a crucial role in achieving the perfect texture and flavor for this holiday masterpiece:
- Unsalted Butter (Room Temperature): The foundation of our tender Linzer cookie dough. Using unsalted butter allows you to control the salt content precisely. Ensure it’s at room temperature for easy creaming and a smooth dough consistency.
- Powdered Sugar (Divided): Contributes to the cookies’ light, delicate texture and sweet flavor. A portion is used in the dough, and the remaining half cup is for dusting the top cookies, creating that beautiful “snowy” effect.
- Egg Whites: Unlike many cookie recipes that use whole eggs, relying solely on egg whites helps create a lighter, crisper cookie with a more refined texture. Don’t let the leftover yolks go to waste; they’re perfect for making rich desserts like chocolate-dipped sugar cookies!
- Pure Vanilla Extract: A touch of pure vanilla extract enhances all the other flavors, adding a warm, aromatic note that is essential in any sweet treat.
- All-Purpose Flour: Provides the necessary structure for the cookies, ensuring they hold their shape beautifully during baking and cutting. Accurate measurement is key for the best results.
- Kosher Salt: A pinch of salt is vital for balancing the sweetness and intensifying the overall flavor profile of the cookies.
- Biscoff Cookie Butter: This is the star of our filling! Its unique, spiced, and creamy texture makes for an incredibly flavorful and smooth center for these sandwich cookies. It pairs wonderfully with the festive theme.
- Chocolate Chips (Melted): Used for decorating, melted chocolate chips are perfect for piping the delicate reindeer antlers and eyes, bringing Rudolph’s face to life. Dark, milk, or semi-sweet chocolate chips all work well.
- Red Cinnamon Candies: These vibrant red candies serve as Rudolph’s iconic nose. Their cinnamon flavor complements the spiced cookie butter perfectly. Brands like Brach’s Cinnamon Imperials or Red Hots are excellent choices. For those who prefer a less spicy option, red Chocolate Sixlets, red candy beads, or small red jelly beans can also be used.

Storing Your Reindeer Cookies for Lasting Freshness
To ensure your enchanting **Reindeer Cookies** remain as fresh and delicious as possible, proper storage is key. These delicate Linzer cookies are at their peak flavor and texture within the first day or two of being made, especially with their creamy cookie butter filling.
You can safely store them in an airtight container at room temperature for up to 3 days. A metal cookie tin, a glass jar with a tight-fitting lid, or a plastic container all work well to keep them protected from air and moisture. For extended freshness, especially if you want them to last longer through the holiday week, you can store them in the refrigerator for up to 1 week. Just be sure to bring them to room temperature before serving for the best taste and texture.
Pro Tip for Making Ahead: If you’re preparing these cookies in advance for a holiday event, I highly recommend freezing the baked (but unfilled and undecorated) Linzer cookie shells. Lay the cooled cookie halves on a baking sheet and freeze until solid, then transfer them to an airtight freezer-safe bag or container. They can be frozen for up to 1 month. When you’re ready to serve, simply thaw the cookies at room temperature, then fill and decorate them fresh. This method prevents the cookie butter filling from potentially making the cookies soggy over time, ensuring a perfectly crisp cookie with a creamy center when enjoyed.
Expert Tips for Perfect Reindeer Cookie Baking
Achieving perfectly shaped and utterly delicious **Reindeer Linzer Cookies** is easier than you think with these expert tips:
- Chill Your Dough: This is a non-negotiable step! Chilling the cookie dough for at least 30 minutes (or even longer) before rolling and cutting is crucial. It firms up the butter, preventing the cookies from spreading excessively in the oven and ensuring they maintain their intricate Linzer shape.
- Flour Your Surface Lightly: When rolling out the dough, use just enough flour on your work surface and rolling pin to prevent sticking. Too much flour can make the cookies tough, so brush off any excess before baking.
- Maximize Your Cuts: To get the most cookies from each batch of dough, arrange your cookie cutters as closely together as possible without overlapping. This minimizes waste and the need for re-rolling.
- Work in Batches: Don’t overcrowd your baking sheets. If you run out of space, work in several batches. Baking cookies in a single layer ensures even cooking and beautiful golden edges.
- Remember Base and Top: When cutting your cookies, always ensure you cut an equal number of solid base cookies and cutout top cookies. This avoids any imbalance when it’s time to assemble your delicious reindeer.
- Even Filling: When spreading the cookie butter, aim for about 1 teaspoon per base cookie. This creates a generous but not overflowing filling. If after pressing the top cookie the center isn’t fully filled, don’t hesitate to spoon in a little extra cookie butter for a perfect finish.
- Explore Filling Varieties: While Biscoff cookie butter is fantastic, feel free to experiment! Other delightful options include different types of nut butters (like almond or cashew butter), a classic fruity jam (raspberry or apricot are traditional Linzer choices), rich Nutella, or even a decadent melted chocolate ganache.
- Precision Piping: For the chocolate antlers and eyes, a small piping bag or a Ziploc bag with a tiny corner snipped off will give you the most control. Start with a very small snip; you can always make it bigger if needed.
- Cool Completely: Allow your cookies to cool entirely on a wire rack before attempting to fill or decorate them. Warm cookies will melt the filling and chocolate, making decoration messy.
Reindeer Cookie Variations & Customizations
While these **Reindeer Linzer Cookies** are perfect as is, part of the joy of holiday baking is the opportunity to get creative! Here are some ideas to customize your cookies and make them uniquely yours:
- Alternative Fillings: As mentioned, don’t limit yourself to cookie butter! Try a festive cranberry jam, a sweet apricot preserve, or a creamy white chocolate ganache for a different flavor profile. Peanut butter can also be a delicious option for those who love the classic combo.
- Different Rudolph Noses: If cinnamon candies aren’t your preference, consider using small red M&M’s, a dab of red frosting, or even a small raspberry candy for Rudolph’s nose. You can also use mini chocolate chips for non-Rudolph reindeer (though Rudolph’s red nose is iconic!).
- Sparkling Antlers: Instead of piping chocolate antlers, you can use thin pretzel sticks broken into antler shapes and pressed into the cookie butter, then drizzled with chocolate. Or, for a truly magical touch, sprinkle edible gold or silver dust onto the set chocolate antlers.
- Festive Sprinkles: Before the chocolate eyes and antlers set, you can gently dust the wet chocolate with tiny festive sprinkles for extra sparkle. Green and red nonpareils would look lovely.
- Cookie Cutter Shapes: While we use a specific Linzer cutter for the reindeer face, you can experiment with the cutout shape for the top cookie. A small star, heart, or Christmas tree cutter could also create charming effects, especially if you adapt the melted chocolate details accordingly.
- Drizzle with White Chocolate: For an extra layer of decoration, after the dark chocolate antlers have set, drizzle a bit of melted white chocolate over the tops of the cookies for a beautiful contrast and added sweetness.
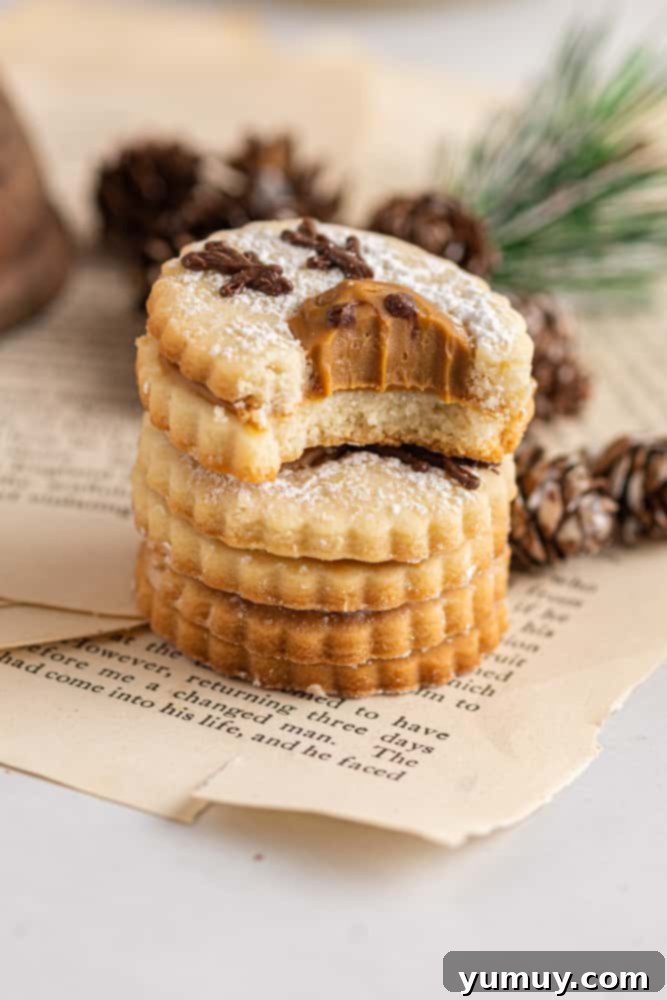

Festive Reindeer Linzer Cookies with Cookie Butter Filling
Ingredients
- 1½ cups unsalted butter room temperature (3 sticks)
- 1½ cups powdered sugar divided
- 2 egg whites
- 1 teaspoon pure vanilla extract
- 3½ cups all-purpose flour
- ½ teaspoon kosher salt
- 1⅓ cups Biscoff cookie butter
- 1 cup chocolate chips melted
- ¼ cup red cinnamon candies such as Red Hots
Equipment
- Kitchen Scale (optional, for precise measurements)
- Stand Mixer (or hand mixer)
- 2 Baking Sheets
- Rolling Pin
- Linzer Cookie Cutter (2-inch, with detachable center cutout)
- Fine-Mesh Sieve
- Piping Bag (or small Ziploc bag)
Instructions
- In the bowl of a stand mixer fitted with the paddle attachment, beat the softened unsalted butter and 1 cup of powdered sugar together on medium speed. Continue mixing until the mixture is beautifully smooth, light, and creamy, which typically takes about 2 minutes. This step is crucial for incorporating air and creating a tender cookie base.1½ cups unsalted butter, 1 cup powdered sugar
- Add the egg whites to the creamed mixture and beat for another minute until they are fully incorporated and the mixture is uniform. Then, stir in the pure vanilla extract, mixing for just a few seconds until its aromatic essence is evenly distributed throughout the dough.2 egg whites, 1 teaspoon pure vanilla extract
- Gradually add the all-purpose flour and kosher salt to the bowl. Beat the mixture on high speed for approximately 2 minutes, or until the dough becomes incredibly smooth and thoroughly combined. Be sure to scrape down the sides of the bowl periodically to ensure all ingredients are well incorporated.3½ cups all-purpose flour, ½ teaspoon kosher salt
- Form the cookie dough into a disc, wrap it securely in plastic wrap, and refrigerate for a minimum of 30 minutes. This chilling period is essential for the dough to firm up, which makes it much easier to handle, roll out, and cut without sticking, ultimately preventing your cookies from spreading too much during baking.
- Once the dough has chilled, remove it from the refrigerator and unwrap it. Preheat your oven to 350°F (175°C). Line two large baking sheets with parchment paper to prevent sticking and ensure even baking. Set these aside, ready for your cookie creations.
- To create the base cookies: On a lightly floured surface, roll out a portion of the chilled dough into a rough rectangle, aiming for a thickness of about ¼-inch. Using a 2-inch Linzer cookie cutter *without* the center circle cutout attachment, cut out 30 base cookies. Gently use a bench knife or a thin spatula to transfer these solid cookies from the floured surface onto your prepared baking sheets, spacing them approximately ½ inch apart.
- Now, for the top cookies: Gather any remaining dough scraps and gently re-form them into a ball. Roll out this dough again into a rough rectangle, maintaining the ¼-inch thickness. Cut out 30 more cookie shapes using the same 2-inch Linzer cookie cutter, still *without* the center circle attachment. After cutting, attach the small center circle cutout tool to your Linzer cutter and carefully punch out an *offset* hole from the center of each of these 30 cookies. This creates the perfect “face” for your reindeer. Remove the small circular dough pieces and carefully transfer the cutout top cookie frames onto your prepared baking sheets, maintaining the ½-inch spacing. If needed, work in batches to avoid overcrowding.
- Bake the cookies in the preheated oven for about 10 minutes. The edges should be just lightly golden. Keep a close watch as baking times can vary between ovens. Once baked, let the cookies cool on the baking sheet for 5 minutes to firm up before gently transferring them to a wire rack to cool completely. It’s crucial they are fully cooled before proceeding with the filling and decoration.
- Continue the rolling, cutting, and baking process with any remaining dough until all of it is used, ensuring you have an equal number of both solid base cookies and cutout top cookies for assembly. This might involve one or two more batches depending on your dough handling.
- To prepare for assembly, arrange all the top cookies (the ones with the center cut out) on parchment paper or a clean, flat surface. Take the remaining ½ cup of powdered sugar and, using a fine-mesh sieve, generously dust it over the tops of these cookies. This creates a beautiful, snowy, and classic Linzer cookie finish.
- Gently warm the Biscoff cookie butter to make it easily spreadable. Place the 1⅓ cups of cookie butter in a microwave-safe bowl and microwave for 15-20 seconds until slightly softened. Using the back of a small spoon or an offset spatula, spread about 1 teaspoon of the softened cookie butter onto the flat side of each base cookie, going almost to the edges. Carefully place a powdered sugar-dusted top cookie directly onto a base cookie, aligning the edges precisely. Gently press down. The cookie butter will naturally rise into the center cutout. If the center isn’t quite full, spoon in a tiny bit more cookie butter. Repeat until all 30 sandwich cookies are assembled.1⅓ cups Biscoff cookie butter
- Now for Rudolph’s iconic red nose! Gently press one red cinnamon candy into the Biscoff cookie butter filling, positioning it near the bottom edge of the cutout. The slightly warm cookie butter will help the candy adhere.¼ cup red cinnamon candies
- The final festive touch: antlers and eyes! Pour the melted chocolate chips into a small piping bag or a Ziploc bag. Snip a very tiny, pin-sized hole in one corner of the bag. Gently squeeze the bag to pipe two small dots for eyes just above Rudolph’s nose. Then, carefully pipe two curving “antlers” from the top edge of the cutout, extending upwards. Allow the chocolate to set completely at room temperature or in the refrigerator for a few minutes before serving or storing.1 cup chocolate chips
